

Phone number/SIP account
Choose your number
You can use VoiceBooker in two ways:
- Purchase a number from VoiceBooker: A VoiceBooker number is ready to use immediately and can be assigned to a bot without configuring an external SIP provider.
- Use your own existing number: Connect a number from your telephone provider to VoiceBooker either as a SIP device, similar to an extension, or through a SIP trunk.
This page explains how to integrate and connect your own number to VoiceBooker. For outbound calling, you must use your own number and configure a SIP account that VoiceBooker can use for the outgoing call.
How to integrate/setup your own number
VoiceBooker can connect an existing telephone number to a bot through a SIP provider. Open the SIP account configuration in the Lines area and use one of the two configuration modes:
- SIP Client (inbound/outbound): VoiceBooker registers with the provider using SIP credentials. Use this when the provider gives you a SIP user, password, registrar, and usually a proxy.
- SIP Trunk (inbound): the provider sends inbound calls to the VoiceBooker trunk destination. Use this when the provider routes calls to a SIP URI or trunk and does not require VoiceBooker to register as a client.
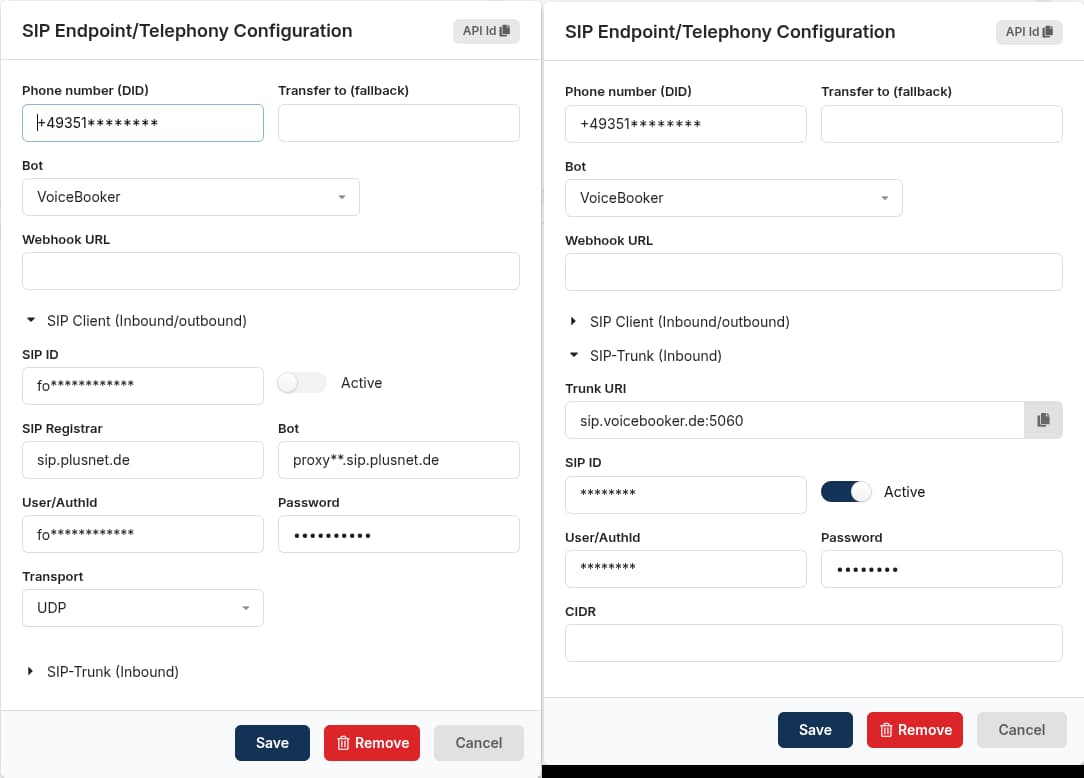
The dialog contains general routing fields and two expandable SIP configuration panels.
General settings
| Field | Purpose |
|---|---|
| Phone number (DID) | The public number associated with this account. Use the international format, for example +49301234567. |
| Transfer to | Optional fallback telephone number or SIP URI for call transfers. Do not include a password in a SIP URI. |
| Bot | Bot that handles inbound calls. Leave it unassigned when the account is only used for another routing purpose. |
| Webhook | Optional URL for provider or call events when your integration needs one. |
SIP Client (Inbound/outbound)
| Field | Purpose |
|---|---|
| SIP ID | Provider-side SIP endpoint or account identifier for the SIP Client mode. |
| Register | Enables registration of the SIP Client with the provider. Enable it when VoiceBooker must register with the provider. |
| SIP Registrar | Provider domain that accepts registration, such as sipgate.de. |
| SIP Proxy | Provider proxy or outbound-proxy hostname. Some providers use the same hostname as the registrar; others provide a separate value. |
| User/AuthId | SIP authentication username. This can differ from the public phone number. |
| Password | SIP authentication password. It is write-only and is not returned after saving. |
| Transport | SIP signaling transport: UDP, TCP, or TLS. Use the provider’s supported transport and matching port. |
SIP Trunk (Inbound)
| Field | Purpose |
|---|---|
| Trunk URI | Fixed VoiceBooker destination for the SIP Trunk mode. Copy sip.voicebooker.de:5060. |
| Trunk SIP ID | Identifier that the provider sends for the inbound trunk, when the provider requires one. |
| Trunk User/Password | Optional credentials for authenticating inbound trunk requests. |
| CIDR | Optional allowed source network in CIDR notation, for example 203.0.113.0/24. Use it only when you know the provider’s signaling source ranges. |
| Active | Enables or disables the inbound trunk account. |
Save the account after entering the values. The connector registration is refreshed when registration-related SIP settings change. Creating an account does not purchase or provision a telephone number.
SIP URI and number formats
A SIP URI generally has this form:
sip:<user>@<host>:<port>The port is optional when the provider uses its default. For secure signaling, a provider may use sips: or require TLS with port 5061. Do not put the SIP password into the URI. Phone numbers should normally be entered in E.164 format, for example +49301234567; use the provider’s required format for a trunk-specific user or inbound identifier.
The Trunk URI destination is fixed. Copy this value exactly:
sip.voicebooker.de:5060Provider settings
The values below are the common settings for the provider’s standard SIP client or VoIP service. Provider portals may show account-specific usernames, passwords, proxy URLs, or trunk destinations; those values take precedence over this overview.
Sipgate Business
Create or select the VoIP endpoint in the Sipgate Business account and copy its SIP ID and SIP password. Use:
| VoiceBooker field | Value |
|---|---|
| SIP Registrar | sipconnect.sipgate.de |
| SIP Proxy, UDP | sipconnect.sipgate.de, port 5060 |
| User/AuthId | The endpoint’s sipgate SIP ID |
| Password | The endpoint’s SIP password |
| Transport | UDP |
Sipgate classic/legacy
For Sipgate classic/legacy, use:
| VoiceBooker field | Value |
|---|---|
| SIP Registrar | sipgate.de |
| SIP Proxy, UDP | sipgate.de, port 5060 |
| User/AuthId | The endpoint’s sipgate SIP ID |
| Password | The endpoint’s SIP password |
| Transport | UDP |
easybell
In the easybell customer portal, open the relevant connection under Telefonanschluss → Verbindungen and copy its SIP username and password. For the standard SIP Trunk/VoIP service, use:
| VoiceBooker field | Value |
|---|---|
| SIP Registrar | voip.easybell.de |
| SIP Proxy | voip.easybell.de unless easybell provides a separate proxy for your connection |
| User/AuthId | SIP username from the connection details |
| Password | SIP password from the connection details |
| Transport | UDP |
Use the registrar for the product you actually have. easybell documents pbx.easybell.de for Cloud PBX connections; do not substitute it for voip.easybell.de unless your account is a Cloud PBX connection or easybell instructs you to do so.
fonial
Open the fonial customer account and use the SIP credentials of the target or destination. fonial commonly uses:
| VoiceBooker field | Value |
|---|---|
| SIP Registrar | sip.plusnet.de |
| SIP Proxy | The proxy URL shown in the fonial SIP credentials; fonial may provide a proxy hostname with a number, such as proxyXX.sip.plusnet.de |
| User/AuthId | fonial SIP username from the customer account |
| Password | fonial SIP password |
| Transport | UDP |
Do not invent the proxyXX number. Copy the proxy URL from the fonial account. For inbound trunking, use the VoiceBooker Trunk URI as the destination and configure the fonial target/trunk according to the SIP credentials and routing options shown in the fonial portal.
PASCOM
Use the SIP domain provided by PASCOM as the registrar:
| VoiceBooker field | Value |
|---|---|
| SIP Registrar | The SIP domain provided by PASCOM |
| SIP Proxy | pascom.cloud |
| User/AuthId | PASCOM SIP user ID |
| Password | PASCOM SIP password |
| Transport | TLS |
Recommended setup procedure
- Confirm that the provider account has an active SIP endpoint, DID, or trunk and that you can access its credentials.
- In VoiceBooker, create a SIP account and enter the DID in international format.
- Select the bot that should answer inbound calls.
- Choose SIP Client or SIP Trunk mode according to the provider’s setup.
- Copy registrar, proxy, username, and password from the provider. Never guess credentials or proxy variants.
- Select the matching transport and enable Register for SIP Client mode, or Active for SIP Trunk mode.
- Save the configuration and place a test inbound call. Check the call transcript and SIP/provider logs if the call does not arrive.
Troubleshooting
- Registration fails: verify the SIP ID versus the authentication username, password, registrar, proxy, transport, and port. These are not always identical.
- Registered but no inbound call: verify the DID, bot assignment, provider routing target, and whether the provider requires a separate trunk SIP ID.
- Inbound request rejected: check the trunk username/password and CIDR. Remove an incorrect CIDR restriction while testing, then add the provider’s documented signaling range.
- One-way audio or no audio: check firewall/NAT and the provider’s media requirements. Signaling registration alone does not guarantee media reachability.
- TLS fails: use the provider’s TLS hostname and port, and enable secure media when the provider requires SRTP.
Provider hostnames and requirements can change. If a provider’s account-specific data differs from this page, use the values shown in that provider’s current customer portal or support instructions.